#node update ubuntu
Explore tagged Tumblr posts
Visit Tumblr Blog
Explore Tumblr blogs with no restrictions, modern design and the best experience.
Last Seen Tumblr Blogs


Fun Fact
Tumblr was named as a finalist in Lead411’s New York City Hot 125 in Aug 2010.
Text
#How to Upgrade Node JS to a Specific Version in Ubuntu#update node version in ubuntu#upgrade node js in ubuntu#node update ubuntu#upgrading node version ubuntu#upgrade node ubuntu#ubuntu update node#node ubuntu update#ubuntu update node to 18#upgrade node js ubuntu#how to update node js ubuntu#ubuntu upgrade node#upgrade node version linux#ubuntu nodejs update#ubuntu upgrade node to 16#ubuntu update nodejs version#update node version ubuntu#upgrade nodejs on ubuntu#upgrade nodejs version ubuntu#linux upgrade nodejs#ubuntu upgrade nodejs#upgrade nodejs ubuntu#upgrade node js ubuntu 20.04
0 notes
Text

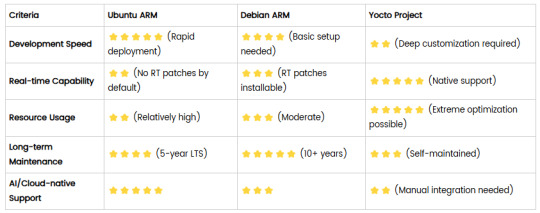
Comparison of Ubuntu, Debian, and Yocto for IIoT and Edge Computing
In industrial IoT (IIoT) and edge computing scenarios, Ubuntu, Debian, and Yocto Project each have unique advantages. Below is a detailed comparison and recommendations for these three systems:
1. Ubuntu (ARM)
Advantages
Ready-to-use: Provides official ARM images (e.g., Ubuntu Server 22.04 LTS) supporting hardware like Raspberry Pi and NVIDIA Jetson, requiring no complex configuration.
Cloud-native support: Built-in tools like MicroK8s, Docker, and Kubernetes, ideal for edge-cloud collaboration.
Long-term support (LTS): 5 years of security updates, meeting industrial stability requirements.
Rich software ecosystem: Access to AI/ML tools (e.g., TensorFlow Lite) and databases (e.g., PostgreSQL ARM-optimized) via APT and Snap Store.
Use Cases
Rapid prototyping: Quick deployment of Python/Node.js applications on edge gateways.
AI edge inference: Running computer vision models (e.g., ROS 2 + Ubuntu) on Jetson devices.
Lightweight K8s clusters: Edge nodes managed by MicroK8s.
Limitations
Higher resource usage (minimum ~512MB RAM), unsuitable for ultra-low-power devices.
2. Debian (ARM)
Advantages
Exceptional stability: Packages undergo rigorous testing, ideal for 24/7 industrial operation.
Lightweight: Minimal installation requires only 128MB RAM; GUI-free versions available.
Long-term support: Up to 10+ years of security updates via Debian LTS (with commercial support).
Hardware compatibility: Supports older or niche ARM chips (e.g., TI Sitara series).
Use Cases
Industrial controllers: PLCs, HMIs, and other devices requiring deterministic responses.
Network edge devices: Firewalls, protocol gateways (e.g., Modbus-to-MQTT).
Critical systems (medical/transport): Compliance with IEC 62304/DO-178C certifications.
Limitations
Older software versions (e.g., default GCC version); newer features require backports.
3. Yocto Project
Advantages
Full customization: Tailor everything from kernel to user space, generating minimal images (<50MB possible).
Real-time extensions: Supports Xenomai/Preempt-RT patches for μs-level latency.
Cross-platform portability: Single recipe set adapts to multiple hardware platforms (e.g., NXP i.MX6 → i.MX8).
Security design: Built-in industrial-grade features like SELinux and dm-verity.
Use Cases
Custom industrial devices: Requires specific kernel configurations or proprietary drivers (e.g., CAN-FD bus support).
High real-time systems: Robotic motion control, CNC machines.
Resource-constrained terminals: Sensor nodes running lightweight stacks (e.g., Zephyr+FreeRTOS hybrid deployment).
Limitations
Steep learning curve (BitBake syntax required); longer development cycles.
4. Comparison Summary
5. Selection Recommendations
Choose Ubuntu ARM: For rapid deployment of edge AI applications (e.g., vision detection on Jetson) or deep integration with public clouds (e.g., AWS IoT Greengrass).
Choose Debian ARM: For mission-critical industrial equipment (e.g., substation monitoring) where stability outweighs feature novelty.
Choose Yocto Project: For custom hardware development (e.g., proprietary industrial boards) or strict real-time/safety certification (e.g., ISO 13849) requirements.
6. Hybrid Architecture Example
Smart factory edge node:
Real-time control layer: RTOS built with Yocto (controlling robotic arms)
Data processing layer: Debian running OPC UA servers
Cloud connectivity layer: Ubuntu Server managing K8s edge clusters
Combining these systems based on specific needs can maximize the efficiency of IIoT edge computing.
0 notes
Photo

New Post has been published on https://codebriefly.com/building-and-deploying-angular-19-apps/
Building and Deploying Angular 19 Apps
Efficiently building and deploying Angular 19 applications is crucial for delivering high-performance, production-ready web applications. In this blog, we will cover the complete process of building and deploying Angular 19 apps, including best practices and optimization tips.
Table of Contents
Toggle
Why Building and Deploying Matters
Preparing Your Angular 19 App for Production
Building Angular 19 App
Key Optimizations in Production Build:
Configuration Example:
Deploying Angular 19 App
Deploying on Firebase Hosting
Deploying on AWS S3 and CloudFront
Automating Deployment with CI/CD
Example with GitHub Actions
Best Practices for Building and Deploying Angular 19 Apps
Final Thoughts
Why Building and Deploying Matters
Building and deploying are the final steps of the development lifecycle. Building compiles your Angular project into static files, while deploying makes it accessible to users on a server. Proper optimization and configuration ensure faster load times and better performance.
Preparing Your Angular 19 App for Production
Before building the application, make sure to:
Update Angular CLI: Keep your Angular CLI up to date.
npm install -g @angular/cli
Optimize Production Build: Enable AOT compilation and minification.
Environment Configuration: Use the correct environment variables for production.
Building Angular 19 App
To create a production build, run the following command:
ng build --configuration=production
This command generates optimized files in the dist/ folder.
Key Optimizations in Production Build:
AOT Compilation: Reduces bundle size by compiling templates during the build.
Tree Shaking: Removes unused modules and functions.
Minification: Compresses HTML, CSS, and JavaScript files.
Source Map Exclusion: Disables source maps for production builds to improve security and reduce file size.
Configuration Example:
Modify the angular.json file to customize production settings:
"configurations": "production": "optimization": true, "outputHashing": "all", "sourceMap": false, "namedChunks": false, "extractCss": true, "aot": true, "fileReplacements": [ "replace": "src/environments/environment.ts", "with": "src/environments/environment.prod.ts" ]
Deploying Angular 19 App
Deployment options for Angular apps include:
Static Web Servers (e.g., NGINX, Apache)
Cloud Platforms (e.g., AWS S3, Firebase Hosting)
Docker Containers
Serverless Platforms (e.g., AWS Lambda)
Deploying on Firebase Hosting
Install Firebase CLI:
npm install -g firebase-tools
Login to Firebase:
firebase login
Initialize Firebase Project:
firebase init hosting
Deploy the App:
firebase deploy
Deploying on AWS S3 and CloudFront
Build the Project:
ng build --configuration=production
Upload to S3:
aws s3 sync ./dist/my-app s3://my-angular-app
Configure CloudFront Distribution: Set the S3 bucket as the origin.
Automating Deployment with CI/CD
Setting up a CI/CD pipeline ensures seamless updates and faster deployments.
Example with GitHub Actions
Create a .github/workflows/deploy.yml file:
name: Deploy Angular App on: [push] jobs: build-and-deploy: runs-on: ubuntu-latest steps: - uses: actions/checkout@v2 - name: Set up Node.js uses: actions/setup-node@v2 with: node-version: '18' - run: npm install - run: npm run build -- --configuration=production - name: Deploy to S3 run: aws s3 sync ./dist/my-app s3://my-angular-app --delete
Best Practices for Building and Deploying Angular 19 Apps
Optimize for Production: Always use AOT and minification.
Use CI/CD Pipelines: Automate the build and deployment process.
Monitor Performance: Utilize tools like Lighthouse to analyze performance.
Secure the Application: Enable HTTPS and configure secure headers.
Cache Busting: Use hashed filenames to avoid caching issues.
Containerize with Docker: Simplifies deployments and scales easily.
Final Thoughts
Building and deploying Angular 19 applications efficiently can significantly enhance performance and maintainability. Following best practices and leveraging cloud hosting services ensure that your app is robust, scalable, and fast. Start building your next Angular project with confidence!
Keep learning & stay safe 😉
You may like:
Testing and Debugging Angular 19 Apps
Performance Optimization and Best Practices in Angular 19
UI/UX with Angular Material in Angular 19
0 notes
Text
How to create a single Node Kubernetes Cluster with dual stack IPv4/IPv6 Support with CRI-O and Calico
In this blog post, I have summarized how I have set up a single-node Kubernetes cluster version 1.32 on a fresh Ubuntu 24.04 with dual stack IPv4/IPv6 support. Tested with: Ubuntu 24.04 Kubeadm 1.32.3 CRI-O 1.32 Calico 3.29.3 Step 1: Update the system sudo apt-get update && sudo apt-get upgrade -y Step 2: Disable Swap sudo swapoff -a sudo sed -i '/swap/d' /etc/fstab Step 3: Install required…
0 notes
Text
CalculiXではじめる構造解析 - インストールから解析まで実践的な手順を解説
CalculiXの概要と特徴 CalculiXは、オープンソースの有限要素法解析ソフトウェアです。 構造解析、熱解析、流体解析など、幅広い分野での利用が可能な強力なツールです。 商用ソフトウェアと同等の機能を備えながら、無料で利用できる点が大きな特徴です。 Ubuntuへのインストール手順 まず、必要なパッケージをインストールします。 sudo apt-get update sudo apt-get install calculix-ccx calculix-cgx インストール完了後、以下のコマンドでバージョンを確認できます。 ccx -v 解析モデルの作成 CalculiXでは、テキストベースの入力ファイル(.inpファイル)を使用してモデルを定義します。 以下は単純な片持ち梁のモデル例です。 *NODE 1, 0.0, 0.0, 0.0 2, 10.0, 0.0, 0.0 3,…
0 notes
Text
Master Ansible: Automation & DevOps with Real Projects
Introduction
In today's fast-paced IT world, automation is no longer a luxury; it's a necessity. One of the most powerful tools driving this revolution is Ansible. If you're looking to simplify complex tasks, reduce human error, and speed up your workflows, mastering Ansible is a must. This article will take you through Ansible’s role in DevOps and automation, providing practical insights and real-world examples to help you get the most out of it.
What is Ansible?
Ansible is an open-source tool that automates software provisioning, configuration management, and application deployment. Initially developed by Michael DeHaan in 2012, it has quickly risen to become a favorite among IT professionals.
The tool is known for its simplicity, as it doesn’t require agents to be installed on the machines it manages. Ansible operates through a simple YAML syntax, making it accessible even to beginners.
Why Ansible is Essential for Automation
Ansible’s automation capabilities are vast. It saves time by automating repetitive tasks, such as server configuration and software installations. By eliminating manual processes, it reduces the chance of human error. In short, Ansible gives teams more time to focus on high-priority work, enabling them to be more productive.
The Role of Ansible in DevOps
In a DevOps environment, where continuous integration and continuous deployment (CI/CD) pipelines are critical, Ansible plays a crucial role. It helps manage configurations, automate deployments, and orchestrate complex workflows across multiple systems. This ensures that your applications are delivered faster and with fewer issues.
Key Areas Where Ansible Shines in DevOps:
Configuration Management: Ensures consistency across servers.
Orchestration: Automates multi-tier rollouts.
Continuous Deployment: Simplifies application rollouts with zero downtime.
How Ansible Works
One of the most appealing aspects of Ansible is its agentless architecture. Unlike other automation tools, you don’t need to install agents on the systems Ansible manages. It uses SSH (Secure Shell) to communicate, making it lightweight and secure.
There are two main configuration models:
Push Model: Where Ansible pushes configurations to the nodes.
Pull Model: Common in other tools but not the default in Ansible.
Ansible Playbooks: The Heart of Automation
Playbooks are your go-to resource if you want to automate tasks with Ansible. Playbooks are files written in YAML that define a series of tasks to be executed. They are straightforward and readable, even for those with limited technical expertise.
Understanding Ansible Modules
Ansible comes with a wide range of modules, which are units of code that execute tasks like package management, user management, and networking. You can think of modules as the building blocks of your playbooks.
For example:
apt for managing packages on Ubuntu.
yum for managing packages on CentOS/RHEL.
file for managing files and directories.
Real-World Ansible Use Cases
Ansible isn’t just for small-scale automation. It’s used in enterprises around the world for various tasks. Some common use cases include:
Automating Cloud Infrastructure: Managing AWS, GCP, or Azure environments.
Managing Docker Containers: Automating container orchestration and updates.
Database Management: Automating tasks like backups, migrations, and configuration management.
Ansible vs. Other Automation Tools
Ansible often gets compared to other tools like Puppet, Chef, and Terraform. While each tool has its strengths, Ansible is popular due to its simplicity and agentless nature.
Ansible vs. Puppet: Puppet requires agents, while Ansible does not.
Ansible vs. Chef: Chef has a more complex setup.
Ansible vs. Terraform: Terraform excels at infrastructure as code, while Ansible is better for application-level automation.
Advanced Ansible Techniques
Once you’ve mastered the basics, you can dive into more advanced features like:
Using Variables: Pass data dynamically into your playbooks.
Loops and Conditionals: Add logic to your tasks for more flexibility.
Error Handling: Use blocks and rescue statements to manage failures gracefully.
Ansible Galaxy: Boost Your Efficiency
Ansible Galaxy is a repository for pre-built roles that allow you to speed up your automation. Instead of building everything from scratch, you can leverage roles that the community has shared.
Security Automation with Ansible
Security is a growing concern in IT, and Ansible can help here too. You can automate tasks like:
Security Patches: Keep your systems up-to-date with the latest patches.
Firewall Configuration: Automate firewall rule management.
Monitoring and Logging with Ansible
To ensure that your systems are running smoothly, Ansible can help with monitoring and logging. Integrating tools like ELK (Elasticsearch, Logstash, Kibana) into your playbooks can help you stay on top of system health.
Ansible Best Practices
To ensure your Ansible setup is as efficient as possible:
Structure Your Playbooks: Break large playbooks into smaller, reusable files.
Version Control: Use Git to manage changes.
Document Everything: Make sure your playbooks are well-documented for easy handover and scaling.
Conclusion
Ansible is a powerful automation tool that simplifies everything from configuration management to application deployment. Its simplicity, flexibility, and agentless architecture make it an ideal choice for both small teams and large enterprises. If you're serious about improving your workflows and embracing automation, mastering Ansible is the way forward.
FAQs
What are Ansible's prerequisites?
You need Python installed on both the controller and managed nodes.
How does Ansible handle large infrastructures?
Ansible uses parallelism to manage large infrastructures efficiently.
Can Ansible manage Windows machines?
Yes, Ansible has modules that allow it to manage Windows servers.
Is Ansible free to use?
Ansible is open-source and free, though Ansible Tower is a paid product offering additional features.
How often should playbooks be updated?
Playbooks should be updated regularly to account for system changes, software updates, and security patches.
0 notes
Text
Containerization with Docker and Kubernetes: An Essential Guide
Docker and Kubernetes have emerged as foundational tools for containerization and orchestration in the rapidly evolving landscape of cloud-native technologies. This blog post explores their roles, provides setup guides, and highlights key use cases demonstrating their power and flexibility.
Introduction to Containerization
Containerization is a lightweight alternative to traditional virtualization, enabling applications to run in isolated environments. This approach solves many problems related to environment consistency, application deployment, and scalability.
Docker: The Containerization Pioneer
What is Docker?
Docker is an open-source platform that automates the deployment of applications inside lightweight, portable containers. It encapsulates an application and its dependencies, ensuring it runs consistently across various environments.
Why Use Docker?
Consistency: Ensures the application behaves the same, regardless of where it is run.
Efficiency: Reduces overhead by sharing the host OS kernel.
Portability: Facilitates seamless movement of applications between development, testing, and production environments.
Setting Up Docker
1. Install Docker:
- Windows & macOS: Download the Docker Desktop installer from [Docker's official site](https://www.docker.com/products/docker-desktop).
- Linux: Use the package manager. For example, on Ubuntu:
sudo apt-get update
sudo apt-get install docker-ce docker-ce-cli containerd.io
2. Verify Installation:
docker --version
3. Run Your First Container:
docker run hello-world
Docker Use Cases
- Microservices: Simplifies the deployment and management of microservice architectures.
- DevOps: Streamlines CI/CD pipelines by providing consistent environments.
- Hybrid Cloud: Enables seamless movement of workloads between on-premises and cloud environments.
Kubernetes: Orchestrating Containers at Scale
What is Kubernetes?
Kubernetes, often abbreviated as K8s, is an open-source platform for automating the deployment, scaling, and operation of containerized applications. It manages clusters of containers, ensuring high availability and scalability.
Why Use Kubernetes?
- Scalability: Automatically scales applications based on demand.
- Self-Healing: Automatically restarts, replaces, and reschedules containers when they fail.
- Service Discovery & Load Balancing: Efficiently balances traffic and discovers services without manual intervention.
Setting Up Kubernetes
1. Install Kubernetes Tools:
- kubectl: Command-line tool for interacting with Kubernetes clusters.
- Minikube: Local Kubernetes cluster for development.
# Install kubectl
sudo apt-get update
sudo apt-get install -y kubectl
Install Minikube
curl -Lo minikube https://storage.googleapis.com/minikube/releases/latest/minikube-linux-amd64
chmod +x minikube
sudo mv minikube /usr/local/bin/
2. Start Minikube:
minikube start
3. Deploy an Application:
kubectl create deployment hello-node --image=k8s.gcr.io/echoserver:1.4
kubectl expose deployment hello-node --type=LoadBalancer --port=8080
minikube service hello-node
Kubernetes Use Cases
- Complex Applications: Manages applications with multiple, interdependent services.
- CI/CD Pipelines: Enhances automation and reduces the risk of deployment issues.
- Multi-Cloud Deployments: Orchestrates applications across various cloud providers.
Integrating Docker and Kubernetes
While Docker provides the containerization platform, Kubernetes offers robust orchestration capabilities. Together, they form a powerful combination for building, deploying, and managing cloud-native applications.
Example Workflow:
1. Build Docker Image:
docker build -t my-app .
2. Push to Container Registry:
docker tag my-app my-repo/my-app
docker push my-repo/my-app
3. Deploy with Kubernetes:
kubectl create deployment my-app --image=my-repo/my-app
kubectl expose deployment my-app --type=LoadBalancer --port=80
Conclusion
Containerization with Docker and Kubernetes revolutionizes how applications are developed, deployed, and managed. By leveraging Docker's simplicity and Kubernetes' powerful orchestration capabilities, organizations can achieve greater agility, scalability, and reliability in their cloud-native journey.
For more details click www.hawkstack.com
#redhatcourses#information technology#linux#container#docker#kubernetes#containerorchestration#containersecurity#dockerswarm#aws
0 notes
Text
Docker is an open-source platform for developing, shipping, and running applications. It is designed to make it easier to create, deploy, and run applications by using containers. With Docker, developers can package their applications into standardized units called containers, which can then be run on any computer, regardless of the operating system or hardware. Docker Compose is a tool that allows you to define and run multi-container Docker applications.
With Docker Compose, you can use a YAML file to define the services, networks, and volumes for your application, and then use a single command to build and run all of the containers for your application. This makes it easy to manage and deploy complex applications that require multiple containers, such as web applications that use a database, a message queue, and a caching service. In this tutorial, you’ll install and use Docker Compose on Ubuntu 24.04.
Start by updating the Ubuntu packages in the package manager cache to the latest available versions using the following command Read more...
#cloud web hosting#ssd hosting provider#low cost cloud vps#best cheap servers#affordable vps#best cheap vps
0 notes
Text
Article on How to install Angular on Ubuntu
Ubuntu is an open source operating system from the house of Linux. You will get security, support, and managed services from the publisher of Ubuntu with cutting age technology .To install Angular on Ubuntu, you first need to have Node.js and npm (Node Package Manager) installed . Then you will able install Angular at your system
Here's a step-by-step guide:
1. First install Node.js and npm :
- Open your terminal (Ctrl+Alt+T).
- Run the following commands to update your package index and install Node.js and npm. Wait for sometime , it may take a little bit time to install.
sudo apt update
sudo apt install nodejs
sudo apt install npm
2. To verify the installation of Node.js , run the following command
node -v
The terminal will return like this
v20.9.0
That means your node.js installation in successfull.
3. Now we need to Install Angular CLI
- CLI stands for Command Line Interface
- In the Terminal type the following
sudo npm install -g @angular/cli
It will also take some time
To verify that Angular CLI has been installed successfully, run this command:
ng version
or
ng v
- You should see output displaying the Angular CLI version, Node.js version, and other related information.

4. How to create a New Project ?
- After installing Angular CLI, you can create a new Angular project by navigating to the directory where you want to create the project and running:
ng new your-app-name
- Here " your-app-name " should be you own app name.
5. A new project will be created . Several projects file automatically generated
your-app-name.css for writing style sheet
your-app-name.html for writing html
your-app-name.ts for writing typed script
you have to create new folder for images , videos other file if required.
6. Serve the Angular Application
- Once the project is created, navigate into the project directory:
cd my-angular-app
- Then, serve the application using the Angular CLI:
ng serve
- This command will build the application and serve it locally. You can access it by navigating to http://localhost:4200 in your web browser.
That's it! You have successfully installed Angular on your Ubuntu system. You can now start building Angular applications and i am sure you will love to work Angular in Ubuntu.
0 notes
Text
Upgrade of OTA System Based on Forlinx OK3568-C Single Board Computer
OTA is a way to upgrade the system for the device without loss, and can remotely deploy new functions to the product. We can not only download the OTA upgrade package through the network, but also upgrade the device by downloading the OTA upgrade package to the SD card or U disk.
In this article, we will introduce the OTA upgrade process, the process of local upgrade program recovery, and the technical details of the upgrade through the Forlinx Embedded OK3568-C development board.
1. Making recovery.img
Recovery The associated source code path:
buildroot/output/OK3568-recovery/build/recovery-develop
If any of the source files in the above directory have been modified, you need to perform the following actions:
(1). forlinx@ubuntu:~/OK3568-linux-source$ source envsetup.sh
(2). Select the recovery configuration for a platform and enter 96
(3). forlinx@ubuntu:~/OK3568-linux-source$ make recovery-dirclean && make recovery #Clear the compilation product and recompile
(4). forlinx@ubuntu:~/OK3568-linux-source$ make rkupdate-dirclean && make rkupdate #Clear the compilation product and recompile
If you have not modified the source code files in the above directory, then do the following directly:
(1). forlinx@ubuntu:~/OK3568-linux-source$ ./build.sh recovery #compile to generate recovery.img
(2). forlinx@ubuntu:~/OK3568-linux-source$ ./mkfirmware.sh
# Copy the generated firmware to the rockdev/ directory
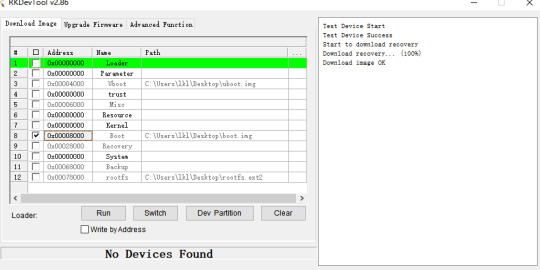
Flash/OK3568-linux-source/buildroot/output/OK3568-recovery/images/recovery.img file.
Click Device Partition Table, tick 9, select recovery path, and click Execute.
2. Make an upgrade image
How to verify that the upgrade was successful? We need to have a preliminary understanding of the boot.img file holds the device tree and kernel, and we just need to make appropriate changes to the device tree or kernel. This routine updates the boot.img file as an example, with appropriate changes to the device tree.
Modify the device tree:
/OK3568-linux-source/kernel/arch/arm64/boot/dts/rockchip/OK3568-C-common.dtsi,Modify the forlinx _ control node as follows. By default, only the HDMI output is turned on, leaving the MIPI and LVDS outputs off.

Modify the file:
/OK3568-linux-source/tools/linux/Linux_Pack_Firmware/rockdev/package-file
Modify this file as required, this routine updates boot.img as an example, so comment out the other .img files. Users can adjust this file to meet product update requirements.
This routine takes the example of modifying the device tree display and recompiling the kernel after modifying the device tree.
forlinx@ubuntu:~ /OK3568-linux-source$ ./build.sh kernel #modify the device tree, then regenerate the kernel
forlinx@ubuntu:~/OK3568-linux-source$ ./build.sh updateimg #package Upgrade Package Firmware
Use /Ok3568--linux-source/rockdev/update.img file to upgrade.
3. Upgrade operation
SD card or USB flash drive upgrade
Mount the SD card or USB disk to the /run/media directory of the OK3568-C development board by default. Copy the update.img image file to the /userdata directory of the OK3568-C development board, and the system will detect the upgrade package in this directory and upgrade it automatically after rebooting the board.
FTP server upgrade
Execute the following command on the OK3568-C development board to copy the upgrade package file from the server to the development board for upgrading.
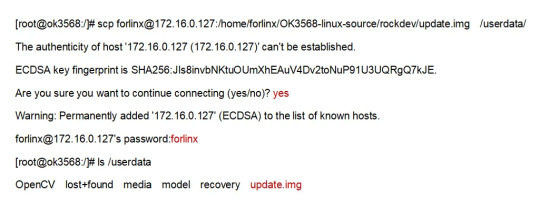
After the download is complete use the following command to upgrade:
update ota /userdata/update.img
During the upgrade process, the device will enter recovery mode and upgrade automatically, after the upgrade is successful, it will enter the normal normal system.
4. Verify the test results
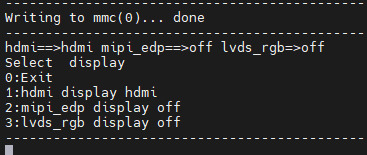
Power up the OK3568-C development board and the serial terminal will enter the uboot screen selection interface by holding down the space bar. The phenomenon of flashing default factory image files: by default, HDMI, MIPI, and LVDS three outputs are enabled.

Phenomenon after flashing upgrade package image file: Only HDMI display is enabled, and the other two outputs are closed.
5. Safety instructions
When creating the update.img firmware, remember you can choose to include all partitions or just specific ones. Modify the package-file to remove unnecessary partitions, reducing the update.img size.
If ''recovery.img'' is included in the ''package-file,'' it won't be upgraded in Recovery mode. To prevent issues where power loss during recovery.img upgrading could disrupt the upgrade of other partitions, it's recommended to upgrade this partition under normal system mode. When executing the update command, the system will first check if ''recovery.img'' is included in the update.img package. If so, it will upgrade the recovery partition before entering Recovery mode to upgrade other partition firmware.
It's not recommended to include the ''misc'' partition in the update.img. Even if it's included, the upgrade program will ignore it when detected. Even if the ''misc'' partition is upgraded, the recovery program will still clear all commands and parameters in the ''misc'' partition after a successful upgrade, which may not yield the expected results.
If the update.img package is placed in the ''userdata'' partition in flash memory, ensure that ''userdata.img'' is not included in the package-file. This is because it may lead to file system damage, potentially causing the OEM or user data partition to fail to mount successfully after the upgrade. If upgrading from an SD card or USB disk, you can pack user data. img to upgrade the user data partition. After the upgrade is completed, the user data partition will be re-sized.
With that, the entire process of OTA upgrades has been explained. Users can follow the instructions in this article for experimentation. Once they are familiar with the operations described in this article, they can modify U-Boot, the kernel, or the file system to remotely upgrade their products via OTA. This enables them to fix bugs in their products, making it more convenient to optimize and iterate on their products.
Originally published at www.forlinx.net.
0 notes
Text
Mastering Hadoop Installation on Ubuntu Server: A Step-by-Step Guide
Are you ready to dive into big data processing with Hadoop on Ubuntu Server? Look no further! In this comprehensive guide, we’ll walk you through the installation process step-by-step, ensuring you have everything you need to get started. Whether you’re a Linux aficionado or a Windows RDP enthusiast looking to buy RDP and install Ubuntu on RDP, this guide has you covered.
Understanding Ubuntu Server: Before we delve into the installation process, let’s take a moment to understand Ubuntu Server. Ubuntu is one of the most popular Linux distributions, known for its stability, security, and ease of use. Ubuntu Server is specifically designed for server environments, making it an ideal choice for hosting Hadoop clusters.

2. Setting Up Your Environment: If you’re using Ubuntu Server on a physical machine or a virtual environment like VMware or VirtualBox, ensure that it meets the minimum system requirements for running Hadoop. This includes having sufficient RAM, disk space, and processing power. Alternatively, if you’re considering using Windows RDP, you can buy RDP and install Ubuntu on it, providing a flexible and scalable environment for Hadoop deployment.
3. Installing Ubuntu Server: Begin by downloading the latest version of Ubuntu Server from the official website. Once downloaded, follow the on-screen instructions to create a bootable USB drive or DVD. Boot your system from the installation media and follow the prompts to install Ubuntu Server. Make sure to allocate disk space for the operating system and any additional storage required for Hadoop data.
4. Configuring Network Settings: After installing Ubuntu Server, configure the network settings to ensure connectivity within your environment. This includes assigning a static IP address, configuring DNS servers, and setting up network interfaces. Proper network configuration is essential for communication between Hadoop nodes in a distributed environment.
5. Updating System Packages: Before installing Hadoop, it’s essential to update the system packages to ensure you have the latest security patches and software updates. Use the following commands to update the package repository and upgrade installed packages:bashCopy codesudo apt update sudo apt upgrade
6. Installing Java Development Kit (JDK): Hadoop is built on Java, so you must install the Java Development Kit (JDK) to run Hadoop applications. Ubuntu repositories provide OpenJDK, an open-source implementation of the Java Platform. Install OpenJDK using the following command:bashCopy codesudo apt install openjdk-11-jdk
7. Downloading and Installing Hadoop: Next, download the latest stable release of Hadoop from the official Apache Hadoop website. Once downloaded, extract the Hadoop archive to a directory of your choice. For example, you can use the following commands to download and extract Hadoop:bashCopy codewget https://www.apache.org/dist/hadoop/common/hadoop-3.3.1/hadoop-3.3.1.tar.gz tar -xvf hadoop-3.3.1.tar.gz
8. Configuring Hadoop Environment: After installing Hadoop, you’ll need to configure its environment variables to specify the Java runtime environment and other settings. Edit the hadoop-env.sh file located in the etc/hadoop directory and set the JAVA_HOME variable to the path of your JDK installation:bashCopy codeexport JAVA_HOME=/usr/lib/jvm/java-11-openjdk-amd64
9. Setting Up Hadoop Cluster: Once Hadoop is installed and configured on your Ubuntu Server, you can proceed to set up a Hadoop cluster. This involves configuring Hadoop’s core-site.xml, hdfs-site.xml, and mapred-site.xml configuration files and starting the Hadoop daemons on each node in the cluster.
10. Testing Hadoop Installation: To ensure that Hadoop is installed and configured correctly, you can run some basic tests. Start by formatting the Hadoop Distributed File System (HDFS) using the following command:bashCopy codehdfs namenode -format
Then, start the Hadoop daemons and verify their status using the following commands:bashCopy codestart-dfs.sh start-yarn.sh
Finally, run a sample MapReduce job to confirm that Hadoop is functioning correctly:bashCopy codehadoop jar $HADOOP_HOME/share/hadoop/mapreduce/hadoop-mapreduce-examples-3.3.1.jar pi 16 10000
Congratulations! You’ve successfully installed Hadoop on the Ubuntu Server, ready to tackle big data processing tasks with ease.
In conclusion, setting up Hadoop on the Ubuntu Server is a straightforward process that anyone can accomplish with the right guidance. Whether you’re a Linux enthusiast or prefer the flexibility of Windows RDP, you can buy RDP and install Ubuntu on it to create a robust Hadoop environment. With Hadoop up and running, you’re well-equipped to handle the challenges of big data processing and analysis.
0 notes
Text

ARMxy Industrial Computer BL410 in Electric Vehicle Charging Stations
Introduction
As the electric vehicle (EV) market continues to grow, the demand for efficient, reliable, and intelligent charging infrastructure is surging. With its flexible I/O configuration, high-performance processing capabilities, and industrial-grade reliability, the BL410 is well suited to meet the complex demands of EV charging systems. This case study explores the application of the BL410 in EV charging stations and highlights its key features and benefits.
Application Scenario
EV charging stations require real-time data acquisition, communication with cloud platforms, and precise control of charging processes. These stations must operate reliably in diverse environmental conditions, support multiple communication protocols, and enable remote monitoring and maintenance. The ARMxy BL410 series addresses these needs through its advanced hardware and software capabilities, making it an excellent choice for both AC and DC charging stations.
Solution Implementation
The BL410 industrial computer is deployed as the central controller in EV charging stations, managing critical functions such as data acquisition, protocol conversion, and cloud integration. Below is an overview of how the BL410 is utilized in this application:
1. Hardware Configuration
The BL410 is customized to meet the specific needs of EV charging stations:
Processor and Memory: Equipped with a Rockchip RK3568J/RK3568B2 quad-core ARM Cortex-A55 processor (up to 2.0 GHz) and 4GB LPDDR4X RAM, the BL410 ensures efficient processing of real-time data and multitasking for charging operations.
Storage: A 32GB eMMC storage configuration provides ample space for firmware, logs, and application data.
I/O Interfaces:
X Series I/O Board (e.g., X23): Configured with 4 RS485 ports for communication with charging modules and meters, and 4 digital inputs/outputs (DI/DO) for controlling relays and monitoring status signals.
Y Series I/O Board (e.g., Y31): Includes 4 analog inputs (0/4-20mA) for monitoring current and voltage during charging.
Communication:
Ethernet Ports: 3x 10/100M Ethernet ports enable robust connectivity to local networks and cloud platforms.
4G Module: A Mini PCIe slot with a 4G module (e.g., BL410L) ensures reliable cellular connectivity for remote access and data transmission.
WiFi Module: Optional WiFi support for local wireless communication.
Power and Protection: Supports a wide voltage range (9-36V DC) with reverse polarity and overcurrent protection, ensuring stable operation in fluctuating power conditions.
Mounting: DIN35 rail mounting facilitates easy installation within charging station enclosures.
2. Software Integration
The BL410’s software ecosystem enhances its suitability for EV charging applications:
Operating System: Runs Ubuntu 20.04, providing a stable and developer-friendly environment for application development.
Protocol Conversion: The pre-installed BLIoTLink software supports protocols such as Modbus, MQTT, and OPC UA, enabling seamless communication with charging modules, energy meters, and IoT cloud platforms like AWS IoT Core and Alibaba IoT.
Remote Access: BLRAT (Beilai Remote Access Tool) allows operators to monitor and maintain charging stations remotely, reducing downtime and service costs.
Node-RED: Facilitates rapid development of IoT applications, such as real-time monitoring dashboards and automated fault detection workflows.
Docker Support: Enables containerized deployment of applications, ensuring scalability and ease of updates.
3. Key Functions
The BL410 performs the following critical functions in EV charging stations:
Data Acquisition: Collects real-time data from energy meters (voltage, current, power) and environmental sensors (temperature, humidity) via analog and digital inputs.
Charging Control: Manages charging sessions by controlling relays and communicating with charging modules to regulate power delivery.
Cloud Integration: Transmits operational data (e.g., charging status, energy consumption) to IoT cloud platforms for analytics and billing.
Fault Detection: Monitors system health and triggers alerts for anomalies, such as overcurrent or communication failures, using Node-RED workflows.
User Interface: Supports optional HDMI output for local display of charging status or integration with touchscreen HMIs using Qt-5.15.2.
4. Environmental Reliability
The BL410 is designed to withstand the harsh conditions often encountered in outdoor charging stations:
Temperature Range: Operates reliably from -40°C to +85°C (with RK3568J SOM), suitable for extreme climates.
IP30 Protection: Prevents dust ingress, ensuring durability in dusty environments.
EMC Compliance: Passes rigorous electromagnetic compatibility tests (e.g., ESD Level III, EFT Level III), minimizing interference and ensuring stable operation.
Vibration and Shock Resistance: Complies with sinusoidal vibration and free-fall tests, making it robust for transportation and installation.
Benefits
The deployment of the ARMxy BL410 in EV charging stations offers several advantages:
Flexibility: Customizable I/O boards and SOM configurations allow tailored solutions for different charging station designs.
Reliability: Industrial-grade design with extensive environmental and EMC testing ensures long-term stability.
Scalability: Support for Docker and cloud integration enables easy expansion as the charging network grows.
Cost-Effectiveness: Remote access and maintenance via BLRAT reduce on-site service costs.
Rapid Development: Node-RED and Qt tools accelerate application development, shortening time-to-market.
Conclusion
The ARMxy BL410 series industrial computer is a powerful and versatile solution for managing EV charging stations. Its high-performance hardware, flexible I/O options, and robust software ecosystem enable efficient data acquisition, reliable communication, and seamless cloud integration. With its proven reliability in harsh industrial environments, the BL410 is helping to power the future of electric vehicle infrastructure, ensuring efficient and scalable charging solutions for a growing market.
0 notes
Text
Navigating the Tech Landscape: How to Choose the Right Hardware for Your SUI Validator Node
In the fast-evolving world of blockchain technology, SUI Validator Nodes play a pivotal role in maintaining network security and integrity. These nodes act as validators in the SUI blockchain, ensuring that transactions are valid and secure. As a prospective SUI Validator Node operator, one of the crucial decisions you'll face is choosing the right hardware to optimize the performance and reliability of your node. In this guide, we'll explore the key considerations to help you make an informed decision and set up a robust SUI Validator Node.
Understanding the Requirements of SUI Validator Nodes
Before delving into hardware specifics, it's essential to grasp the basic requirements of SUI Validator Nodes. These nodes are responsible for validating transactions and reaching consensus within the network. To do this effectively, they must meet certain technical specifications. These include sufficient processing power, memory, storage capacity, and a stable internet connection.
Processing Power: CPU Considerations
The heart of your SUI Validator Node lies in its central processing unit (CPU). The CPU is responsible for executing instructions and processing data, making it a critical component. Aim for a high-performance multi-core processor to handle the computational demands of validating transactions. Popular choices include Intel Core i7 or AMD Ryzen processors, providing the necessary horsepower to keep your node running smoothly.
Memory: RAM Matters
Random Access Memory (RAM) is another crucial factor influencing the performance of your SUI Validator Node. A higher RAM capacity allows your node to store and quickly access data, enhancing overall efficiency. Consider a minimum of 16GB of RAM for optimal performance, with the option to scale up if your node experiences increased demand.
Storage Capacity: SSD vs. HDD
Storage plays a vital role in maintaining the blockchain's ledger and transaction history. While Hard Disk Drives (HDDs) are cost-effective, Solid State Drives (SSDs) offer faster read and write speeds, significantly improving the responsiveness of your SUI Validator Node. Opt for an SSD with sufficient storage capacity to accommodate the growing size of the blockchain.
Network Connectivity: Ensuring Reliability
A stable internet connection is paramount for the continuous operation of your SUI Validator Node. Choose a reliable broadband connection with sufficient bandwidth to handle the data flow associated with validating transactions. Consider a backup connection or failover mechanism to mitigate the impact of potential outages.
Choosing the Right Operating System
Selecting the right operating system is crucial for the stability and security of your SUI Validator Node. Linux distributions such as Ubuntu or CentOS are popular choices due to their stability, security features, and widespread community support. Ensure that your chosen operating system is compatible with the SUI blockchain software.
Scalability: Planning for Growth
As the SUI network evolves, scalability becomes a key consideration. Choose hardware that allows for easy scalability, enabling you to upgrade components such as CPU, RAM, or storage as the demands on your SUI Validator Node increase over time. This future-proofing approach ensures that your node remains competitive and efficient in the long run.
Energy Efficiency: Sustainable Operation
Considering the environmental impact of cryptocurrency mining and validation, opting for energy-efficient hardware is a responsible choice. Look for components with high performance per watt ratios to reduce your node's carbon footprint and operational costs.
Regular Maintenance and Monitoring
Finally, once your SUI Validator Node is up and running, it's crucial to implement a regular maintenance and monitoring routine. Regularly check hardware health, update software, and stay informed about the latest developments in SUI Validator Nodes to adapt your hardware setup accordingly.
Conclusion
In conclusion, choosing the right hardware for your SUI Validator Node involves a careful balance of processing power, memory, storage, and network connectivity. By understanding the specific requirements of SUI Validator Nodes and keeping scalability and energy efficiency in mind, you can build a robust and reliable node that contributes to the security and decentralization of the SUI blockchain. Whether you're a seasoned node operator or a newcomer to the world of blockchain validation, investing time in selecting the right hardware is a crucial step toward a successful and sustainable operation of your SUI Validator Node.
1 note
·
View note
Text
Installing Hadoop on Ubuntu

Certainly! Let’s present the Hadoop installation process on Ubuntu uniquely and engagingly, suitable for an informative yet reader-friendly course email.
Subject: 🚀 Embark on Your Big Data Journey: Install Hadoop on Ubuntu Easily!
👋 Hello Data Enthusiasts!
Are you ready to dive into the world of Big Data with Hadoop? Here’s a straightforward guide to getting Hadoop up and running on your Ubuntu system. Perfect for beginners and experts alike!
🔧 Getting Started: Prep Your System
Freshen Up Ubuntu: sudo apt update && sudo apt upgrade
Java Installation: sudo apt install default-JDK
Java Check: Ensure it’s installed with the Java -version
👤 Create a Dedicated Hadoop User
A simple command: sudo adduser hadoop
🔑 SSH Setup: Key to Connectivity
Install SSH: sudo apt install ssh
For Hadoop User:
Switch user: su — Hadoop
Generate SSH Key: ssh-keygen -t rsa -P “
Authorize Key: cat ~/.ssh/id_rsa.pub >> ~/.ssh/authorized_keys
📥 Download Hadoop: Grab the Latest Version
Use wget with the link from the official Hadoop website.
�� Unpack Hadoop
Unzip it: tar -xzf Hadoop-3.x.x.tar.gz
🌐 Environment Setup: Pointing in the Right Direction
Edit .bashrc: nano ~/.bashrc
Add Hadoop paths (adjust with your Hadoop version):
bashCopy code
export HADOOP_HOME=/home/Hadoop/Hadoop-3.x.x export PATH=$PATH:$HADOOP_HOME/bin:$HADOOP_HOME/sbin
Activate changes: source ~/.bashrc
⚙️ Hadoop Configuration: The Blueprint
Edit key files in $HADOOP_HOME/etc/hadoop/:
core-site.xml, hdfs-site.xml, mapred-site.xml, yarn-site.xml
🎬 Initialize and Launch
Format Hadoop FileSystem: hdfs name node -format
Start the engines: start-dfs. Sh and start-yarn. sh
👀 See Hadoop in Action!
Access Hadoop’s ResourceManager and NameNode via your browser.
🛠️ Tips & Tricks
Check firewall settings.
Log files in $HADOOP_HOME/logs/ are your best friends for any hiccups.
🚀 Your Big Data Adventure Awaits!
With these steps, you’re all set to explore the vast universe of Big Data with Hadoop on your Ubuntu machine.
Happy Data Crunching!
Your [Your Course/Team Name]
Note: Ensure the technical steps are accurate and up-to-date for the course email. Personalize the email with course-specific details and offer support for installation issues. To maintain the email’s integrity and prevent it from being flagged as spam, avoid overusing hyperlinks and ensure it’s sent from a recognized, reputable email address.
Hadoop Training Demo Day 1 Video:
youtube
You can find more information about Hadoop Training in this Hadoop Docs Link
Conclusion:
Unogeeks is the №1 IT Training Institute for Hadoop Training. Anyone Disagree? Please drop in a comment
You can check out our other latest blogs on Hadoop Training here — Hadoop Blogs
Please check out our Best In Class Hadoop Training Details here — Hadoop Training
S.W.ORG
— — — — — — — — — — — -
For Training inquiries:
Call/Whatsapp: +91 73960 33555
Mail us at: [email protected]
Our Website ➜ https://unogeeks.com
Follow us:
Instagram: https://www.instagram.com/unogeeks
Facebook: https://www.facebook.com/UnogeeksSoftwareTrainingInstitute
Twitter: https://twitter.com/unogeeks
#unogeeks #training #ittraining #unogeekstraining
0 notes
Text
How To Setup ProxySQL(MySql Proxy) Server ? Part -1
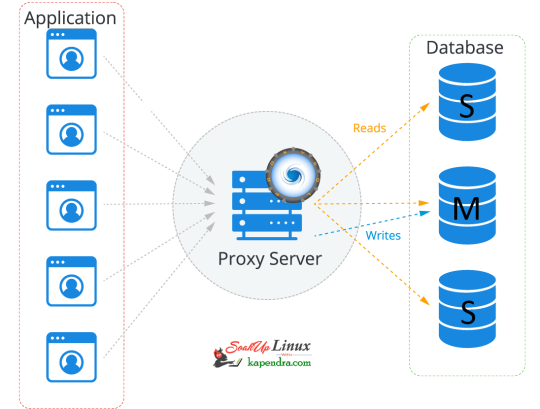
Read with Slave and Write with Master In today's world, most of the infra is cloud-based now and these cloud services are reliable nowadays. if we have a look at RDS in AWS there are reader and writer and AWS RDS decide where to send read/write request. In an ideal scenario, the read request should get the server via MySql slave and write request with MySQL master. Most organizations still use self-hosted MySQL server setups, thus making the ideal situation a bit tough, in this article, we will learn about MySQL Proxy. What is MySQL Proxy? Using MySQL Proxy an application may communicate between one or more MySQL servers and one or more MySQL clients over the network Why Mysql Proxy? MySQLProxy is a middle layer sitting between a MySQL database and an application. The application connects to a proxy, which then forwards connections into the database and it works the application layer.
So let's start getting our hands dirty Our Scenario: Host OS: Ubuntu 18.04 RAM: 2GB memory Proxy server: 172.31.2.24 Master IP: 172.31.2.196 Slave IP:-172.31.2.162 Let's Start Step 1: Add MySQL Proxy Repository To install MySQL proxy we need to set up a repository. follow the below command to install the repo on the Proxy server host. $ apt-get install -y lsb-release $ wget -O - 'https://repo.proxysql.com/ProxySQL/repo_pub_key' | apt-key add - echo deb https://repo.proxysql.com/ProxySQL/proxysql-2.0.x/$(lsb_release -sc)/ ./ | tee /etc/apt/sources.list.d/proxysql.list Step 2: Install MySQL Run the below command on the Proxy server host $ apt-get update $ apt-get install proxysql Note: By default, ProxySQL binds with two Ports 6032 and 6033. MySQL 6032 is the admin port and 6033 is the one that accepts incoming connections from clients. Step 3: Start ProxySQL Now run this simple command to start and enable ProxySQL $ systemctl start proxysql $ systemctl enable proxysql Alternatively, we can do this via the Admin interface as well. $ mysql -u admin -padmin -h 127.0.0.1 -P6032 --prompt='Admin> ' Admin> proxysql start Admin> proxysql stop Step 4: Configuring ProxySQL via the admin interface Before entering the admin interface of ProxySQL, create one application user with all privileges required for your application and one monitoring user at every MySQL DB server. On Mysql Master Host $ mysql -u root -ppassword mysql> CREATE USER 'sysbench'@'%' IDENTIFIED BY 'sysbench'; mysql> GRANT ALL PRIVILEGES on *.* TO 'sysbench'@'%'; mysql> CREATE USER 'monitor'@'%' IDENTIFIED BY 'monitor'; mysql> GRANT USAGE,REPLICATION CLIENT on *.* TO 'monitor'@'%'; mysql> FLUSH PRIVILEGES; On the Proxy server host After installation making the service up and creating the application user, we need to configure ProxySQL In this setup, we are used using need 2 host groups hostgroup 0: For the master hostgroup 1: For the slaves $ mysql -u admin -padmin -h 127.0.0.1 -P6032 --prompt='Admin>' Admin>show databases; +-----+---------------+-------------------------------------+ | seq | name | file | +-----+---------------+-------------------------------------+ | 0 | main | | | 2 | disk | /var/lib/proxysql/proxysql.db | | 3 | stats | | | 4 | monitor | | | 5 | stats_history | /var/lib/proxysql/proxysql_stats.db | +-----+---------------+-------------------------------------+ 5 rows in set (0.00 sec) Add Master for reading and writing requests. Admin>INSERT INTO mysql_servers(hostgroup_id,hostname,port) VALUES (0,'172.31.2.196',3306); Admin>INSERT INTO mysql_servers(hostgroup_id,hostname,port) VALUES (1,'172.31.2.196',3306); Add slave for reading requests Admin>INSERT INTO mysql_servers(hostgroup_id,hostname,port) VALUES (1,'172.31.2.162',3306); Proxysql 2.0 comes with native monitoring for Aurora, by checking the variable “Innodb_read_only”, to determine the reader/Writer for the individual nodes, This info of check has to be added to the table “mysql_replication_hostgroups” in ProxySQL Admin>insert into mysql_replication_hostgroups values (0,1,'read_only','STG'); Admin>LOAD MYSQL SERVERS TO RUNTIME; Admin>SAVE MYSQL SERVERS TO DISK; Note: When we load MYSQL SERVERS, Our writer host also gets configured in the reader host group automatically by ProxySQL to handle all those queries which are redirected to the reader host group in case no slaves are online. this is optional to decrease the weightage assigned to master servers inside the mysql_server table for the reader host group so that most of the read queries will go on the server which has a higher weight. Admin>UPDATE mysql_servers SET weight=200 WHERE hostgroup_id=1 AND hostname='172.31.2.196'; Admin>UPDATE mysql_servers SET weight=1000 WHERE hostgroup_id=1 AND hostname='172.31.2.162'; Configure Monitor monitor user will continuously check the status of the backend in a specified interval. sysbench is the user, created for the application. Admin> UPDATE global_variables SET variable_value='monitor' WHERE variable_name='monitor'; Query OK, 0 rows affected (0.00 sec) Admin> LOAD MYSQL VARIABLES TO RUNTIME; Query OK, 0 rows affected (0.00 sec) Admin> SAVE MYSQL VARIABLES TO DISK; Query OK, 116 rows affected (0.03 sec) INSERT INTO mysql_users(username,password,default_hostgroup) VALUES ('sysbench','sysbench',1); Confirm user details and we will save the configuration to disk: Admin> SELECT username,password,active,default_hostgroup,default_schema,max_connections,max_connections FROM mysql_users; +----------+----------+--------+-------------------+----------------+-----------------+-----------------+ | username | password | active | default_hostgroup | default_schema | max_connections | max_connections | +----------+----------+--------+-------------------+----------------+-----------------+-----------------+ | sysbench | sysbench | 1 | 1 | NULL | 10000 | 10000 | +----------+----------+--------+-------------------+----------------+-----------------+-----------------+ 1 row in set (0.00 sec) Admin> LOAD MYSQL USERS TO RUNTIME; Query OK, 0 rows affected (0.00 sec) Admin> SAVE MYSQL USERS TO DISK; Query OK, 0 rows affected (0.04 sec) Admin> SAVE MYSQL SERVERS TO DISK; Query OK, 0 rows affected (0.30 sec) Step 5: Configure Query Rule After setting up we need to define which host group should get the select query and which should get written. so to do this we need to run the below commands. To send all SELECT queries on the slave ( based on Regex ). Admin> INSERT INTO mysql_query_rules (active, match_digest, destination_hostgroup, apply) VALUES (1, '^SELECT.*', 1, 0); Query OK, 1 row affected (0.00 sec) To send read and write queries on master (based on Regex) Admin> INSERT INTO mysql_query_rules (active, match_digest, destination_hostgroup, apply) VALUES (1, '^SELECT.*FOR UPDATE', 0, 1); Query OK, 1 row affected (0.00 sec) and write an update on the Disk with the below commands Adminl> LOAD MYSQL QUERY RULES TO RUNTIME; Query OK, 0 rows affected (0.00 sec) Admin> SAVE MYSQL QUERY RULES TO DISK; Query OK, 0 rows affected (0.08 sec) This is all you need to configure ProxySQL and now you just have to tell your application to communicate with the ProxySQL host I hope you like this article and I would love to answer your question. in the next article, we will explore ProxySql monitoring, configuration status, and its tests. Read the full article
1 note
·
View note
Text
Infrastructure Essentials: Best Practices for Binance Smart Chain Node Setup and Maintenance
As the decentralized finance (DeFi) space continues to gain momentum, the Binance Smart Chain (BSC) has emerged as a prominent blockchain platform offering high throughput and low transaction fees. Whether you are an enthusiast, developer, or investor looking to participate in the BSC ecosystem, setting up and maintaining a Binance Smart Chain node is a crucial step. In this article, we will explore the infrastructure essentials and best practices for a successful Binance Smart Chain node setup and maintenance.
1. Choose the Right Hardware:
The first step in setting up a Binance Smart Chain node is selecting the appropriate hardware. The hardware requirements will vary depending on the type of node you wish to run (e.g., full node, archive node). While running a full node may not demand the highest-end hardware, it's essential to have a modern computer or server with sufficient processing power, memory (RAM), and storage space. Consider future scalability when choosing your hardware to accommodate potential growth in the BSC network.
2. Pick a Reliable Internet Connection:
A stable and reliable internet connection is crucial for running a Binance Smart Chain node effectively. Since the node will constantly communicate with the BSC network, any disruptions in internet connectivity could impact its performance and synchronization with the blockchain. Opt for a high-speed, low-latency internet connection from a reputable provider to minimize potential downtime.
3. Select the Right Operating System:
When setting up your Binance Smart Chain node, choose an operating system that is compatible with the BSC software and suits your familiarity and preferences. Popular choices include Ubuntu, CentOS, and Debian. Ensure that the operating system is regularly updated with the latest security patches to protect against potential vulnerabilities.

4. Install and Configure BSC Software:
After preparing your hardware and operating system, it's time to install and configure the Binance Smart Chain software. The official BSC repository provides comprehensive documentation and instructions for setting up various types of nodes. Follow the step-by-step guidelines carefully to ensure a smooth installation and proper configuration of your BSC node.
5. Enable Firewall and Security Measures:
Security is of utmost importance when running a Binance Smart Chain node. Implement a firewall to control incoming and outgoing network traffic, and only allow necessary ports for the BSC node to communicate with the network. Additionally, configure secure access methods, such as SSH key authentication, to prevent unauthorized access to your node.
6. Set Up Monitoring and Alerts:
To ensure the optimal performance of your Binance Smart Chain node, set up monitoring tools to track its health and key performance metrics. Utilize tools like Prometheus and Grafana to monitor vital statistics such as CPU usage, memory consumption, disk space, and network activity. Additionally, configure alerts that notify you in case of any abnormal behavior or potential issues to address them promptly.
7. Implement Regular Backups:
Data loss can be catastrophic for your BSC node operation. Implement a robust backup strategy to protect your node's data in case of hardware failures or other unforeseen events. Regularly back up your blockchain data and any necessary configuration files to an off-site storage location or cloud service.
8. Stay Up-to-Date with Software Upgrades:
The Binance Smart Chain ecosystem is continuously evolving, with regular software upgrades and improvements being released. Stay informed about the latest updates and security patches from the official BSC repository. Keep your node software up-to-date to ensure compatibility with the network and benefit from the latest enhancements.
9. Join the BSC Community:
Engaging with the Binance Smart Chain community can be highly beneficial for node operators. Join official forums, social media groups, and developer communities to stay informed about best practices, troubleshooting tips, and potential challenges. The BSC community is supportive and can offer valuable insights to enhance your node's performance.
10. Plan for Scalability:
As the Binance Smart Chain ecosystem grows, the demands on your node may increase. Plan for scalability by anticipating potential traffic growth and adjusting your infrastructure accordingly. Consider load balancing, expanding server resources, or even setting up additional nodes to meet growing demands.
Conclusion:
Setting up and maintaining a Binance Smart Chain node requires careful planning, attention to detail, and a commitment to security and performance. By following the best practices outlined in this article, you can ensure a smooth node setup and efficient operation. A well-maintained BSC node not only contributes to the network's integrity and security but also provides you with opportunities to actively participate in the DeFi ecosystem and support the growth of decentralized finance applications and services. As the BSC network continues to evolve, your properly managed node will play an essential role in the success of the Binance Smart Chain and its impact on the broader blockchain landscape.
1 note
·
View note